How to inject code into PE executables
Hi, all.
Last year, I thought it could be a great idea to combine all possible ways to modify code of an executable in a thread. And one year later this is it ! the post is out ! (thanks to caffeine)
There is a lot of reason why modify / inject code in an assembled executable :
- Inject a shellcode in a legit program to make it a malware
- Modify a program to patch a vulnerability while the update is not available (cc 0patch)
- Crack a program to bypass a check
- Make a malware or a protection signature change to be “FUD”
- Code a cheat for a game (more about runtime modification)
- Just make a “strong” security (assembly level, more about runtime modification again)
Here is what you can do in function of each perspective.
In executable :
- Byte patching
- Code caving
- Code caving with new section
- Creating a new section and make the entrypoint point to it
- Create a new import to a DLL
From external programme :
- Inject a DLL and create a thread
- Inject a DLL and Hook an existing function
Without interactions with the executable :
- DLL Hijack
- Other things with COM, ….
Note : All “In executable” techniques can be used at runtime. Create imports could be a DLL injection or import resolved from code execution in the target executable. And make the entrypoint point to an other function at runtime only can be done in a lot of ways but it’s a little bit useless.
Part 1 : In executable
Byte patching
The simplest way to modify application code is to modify “byte by byte” opcodes, by replacing an opcode buffer by another one. This technique is very common, but has a big problem, you have to override asm code to execute your’s.
Let’s illustrate :
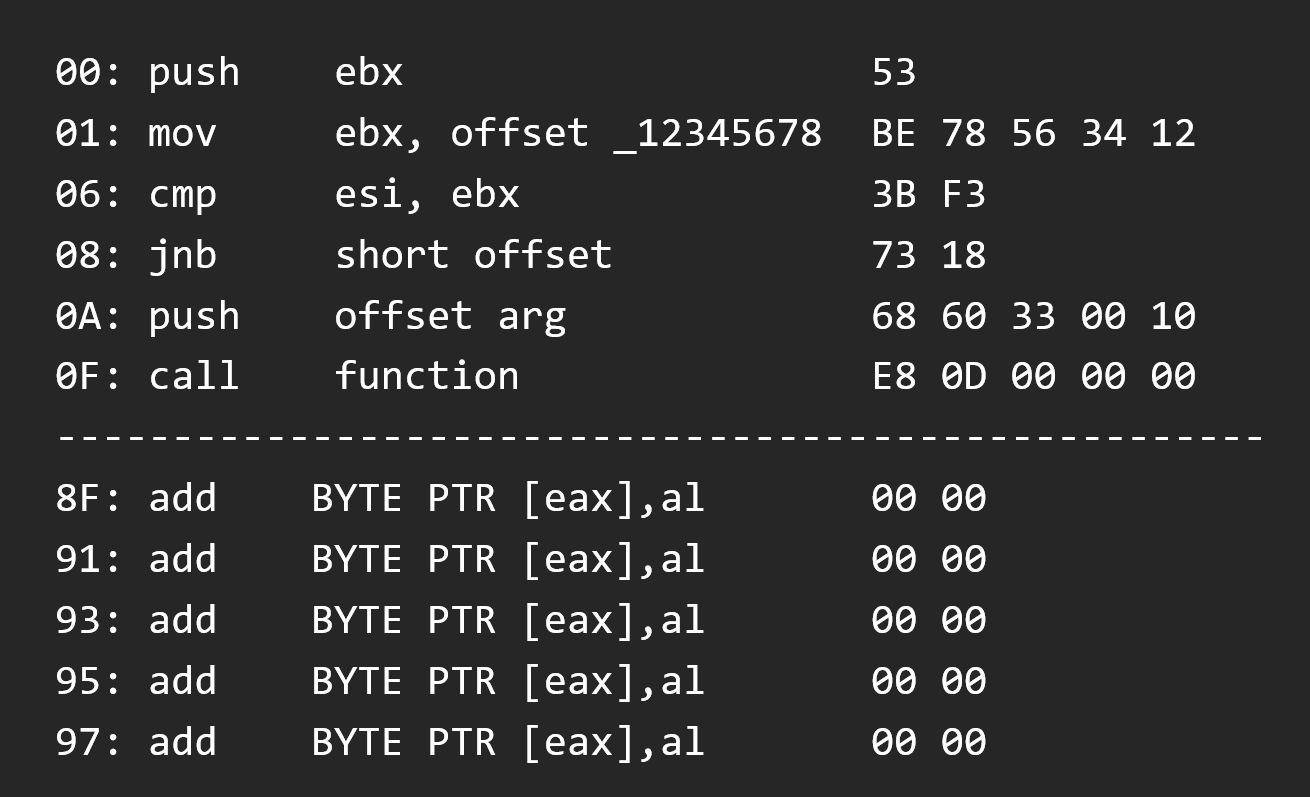
So this is a normal instruction routine
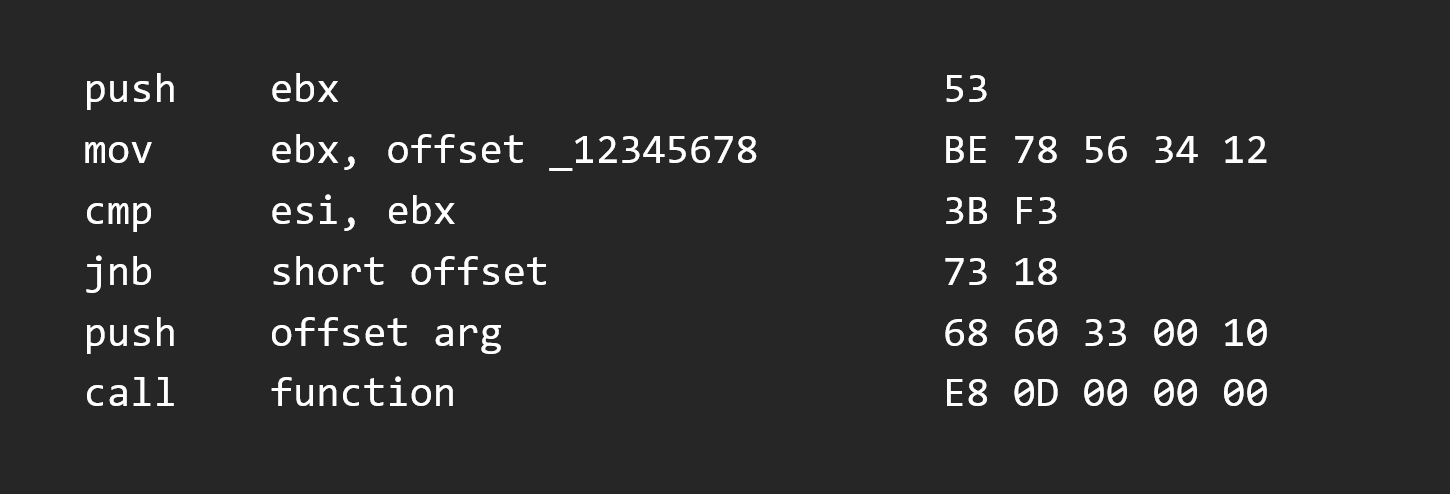
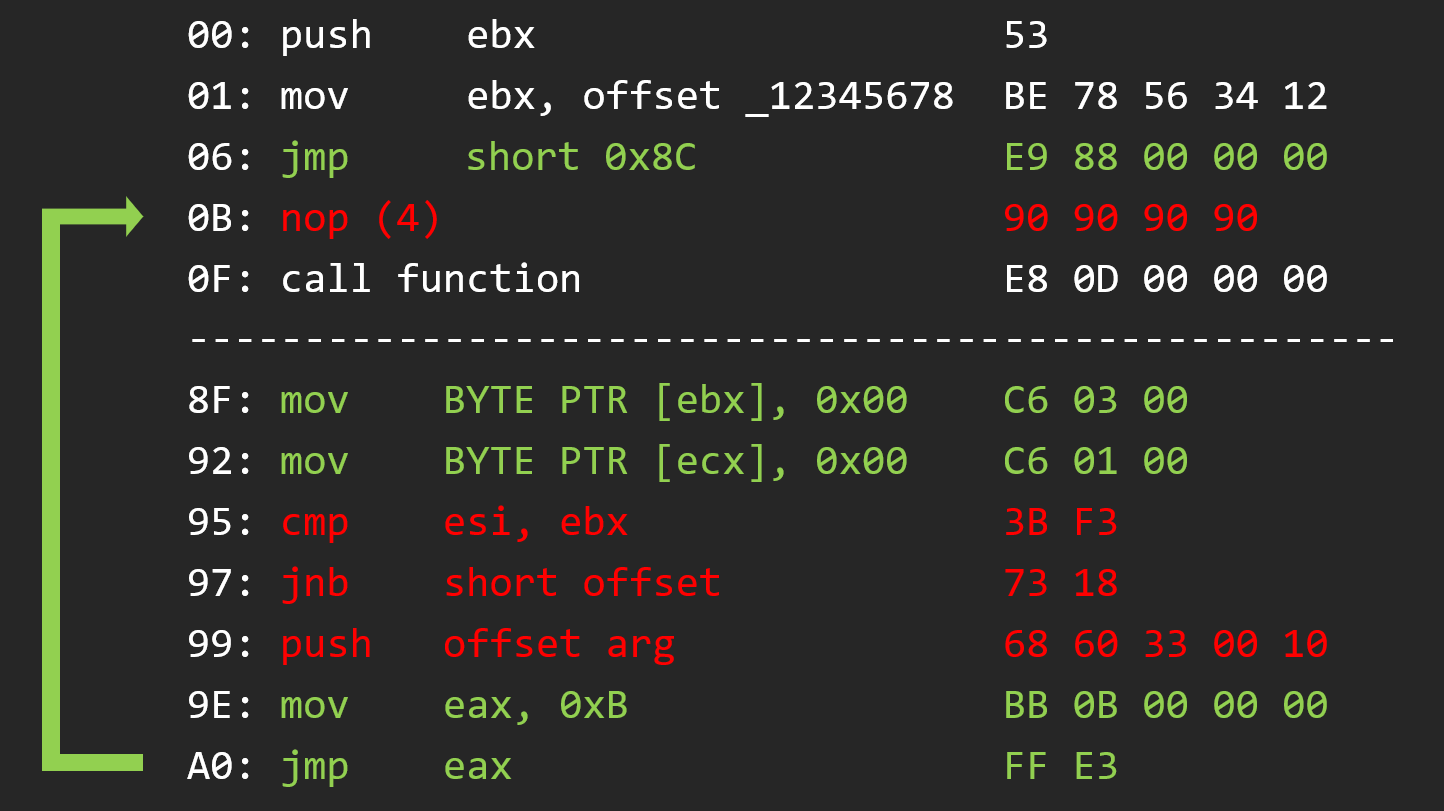
If we want to change the short JNB (Jump if not below) instruction by a short JMP (Jump), we can change it’s bytes and see how it goes.
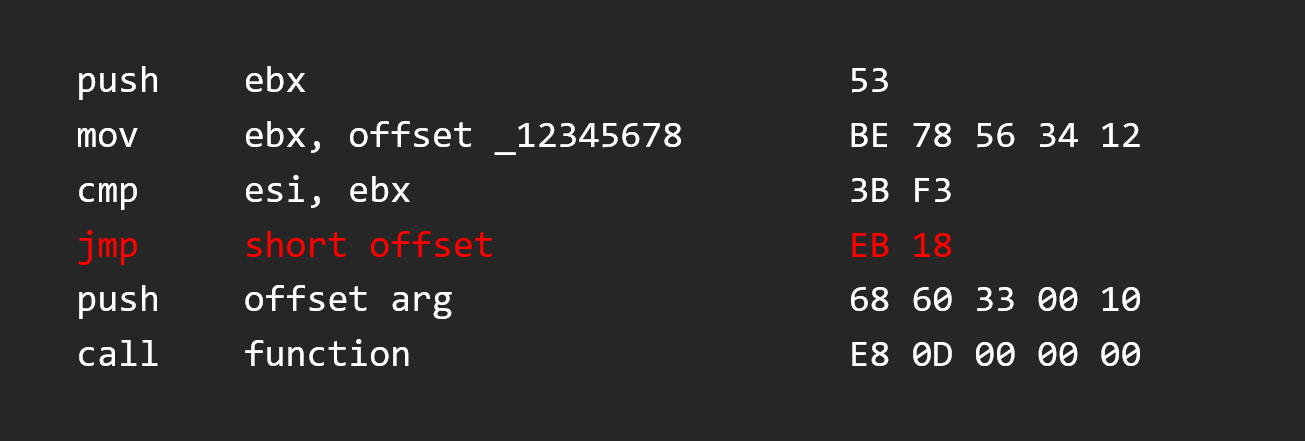
Luckily, the short JMP instruction is the same size of short JNB instruction, so our code fits well in the function.
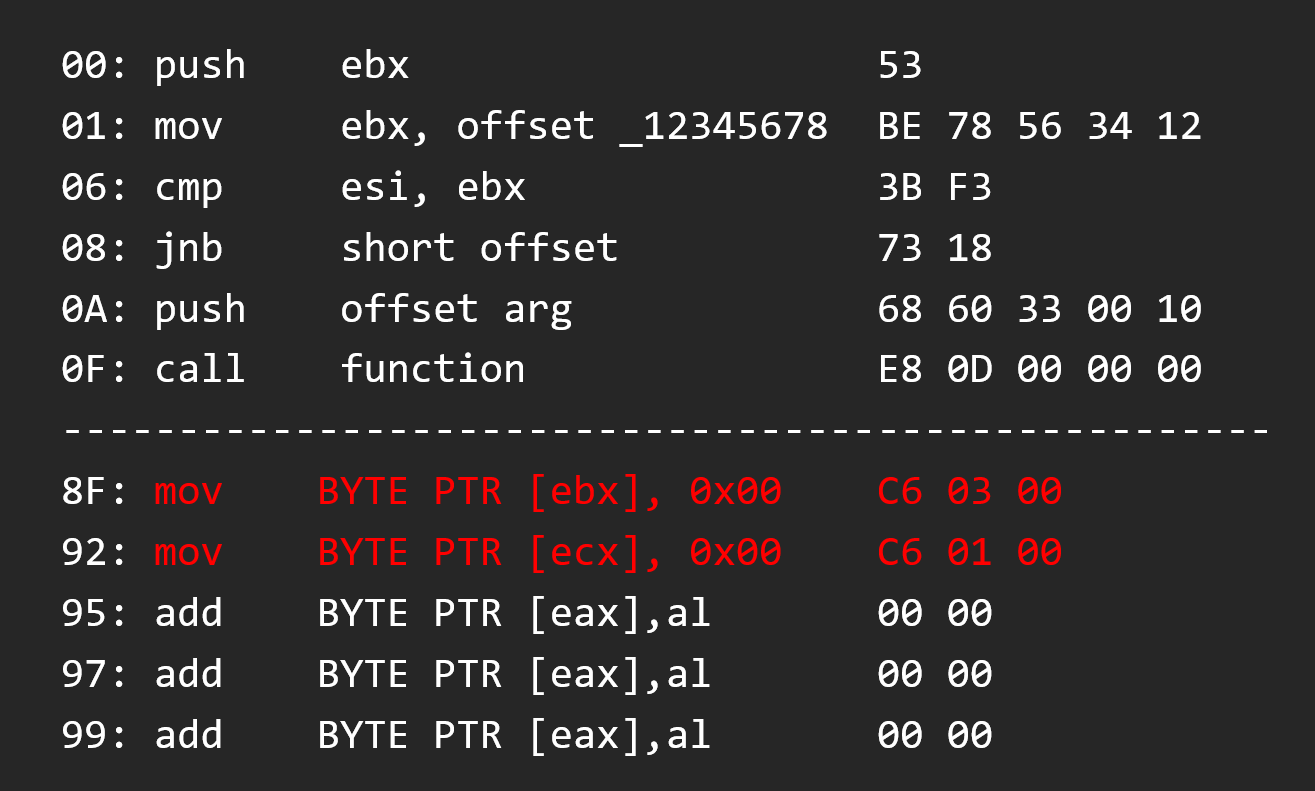
But if we change this instruction again by a larger instruction, we will have a problem.
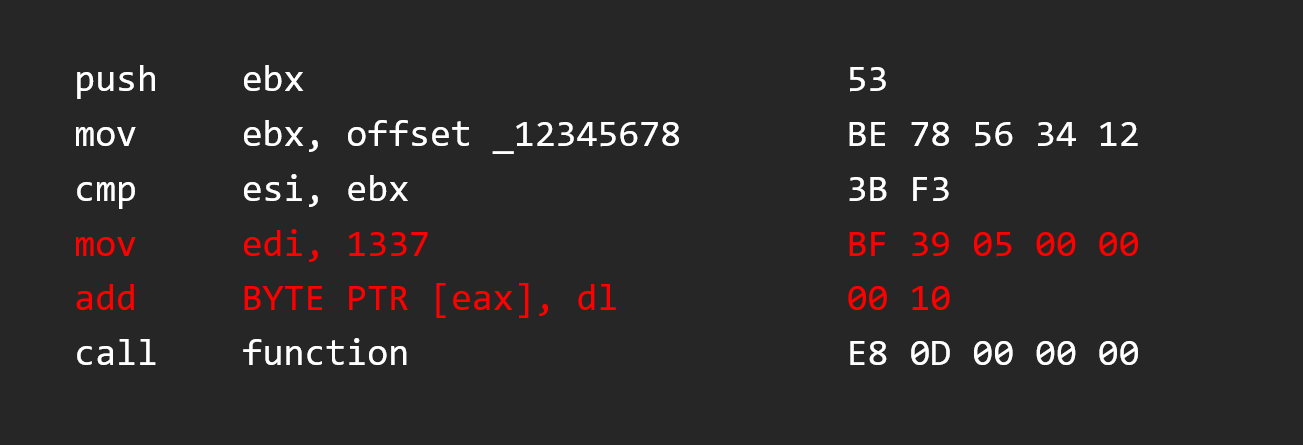
Here we changed the 2 byte JMP instruction by a mov edi, 1337 of 5 bytes, our instruction is here, no problem, but the next instruction is overridden by our new instruction. So now instead of a PUSH instruction, we have an ADD, because the 2 remaining bytes of the old PUSH instruction are interpreted after our MOV
So we can just NOP it to clear it, but we lose an instruction :(
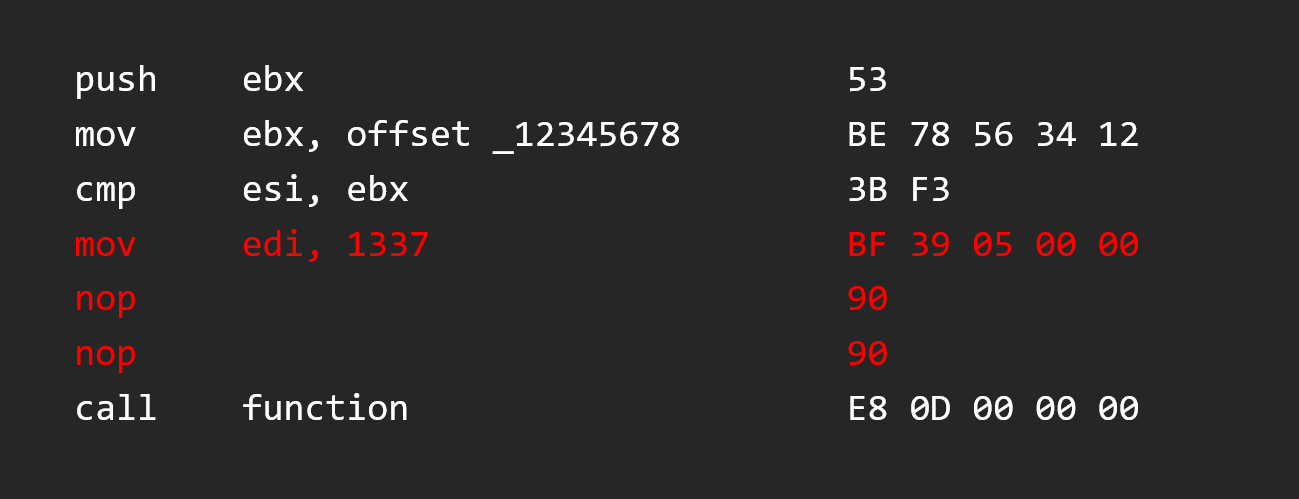
It’s the main problem of this kind of modification, the SIZE.
But there is a solution for this, and it’s the next part.
Code caving
The solution of byte patching size problem is code caving.
Basically code caving is, like its name says, finding a place to put our code, a cave. A buffer of null bytes (0x00) in a section of the PE file (so actual process memory) where we can put our code. And instead of writing our asm code in the raw function, we can write a jump to the cave (with our code in it) and come back to the function code later.
This is a better solution than byte patching sometimes, but we have still a limitation of size, we can only put a asm code of cave size.
Note that the cave should be in a section that has the executable attribut, otherwise our code will not be executed.
Let’s illustate with an executable :
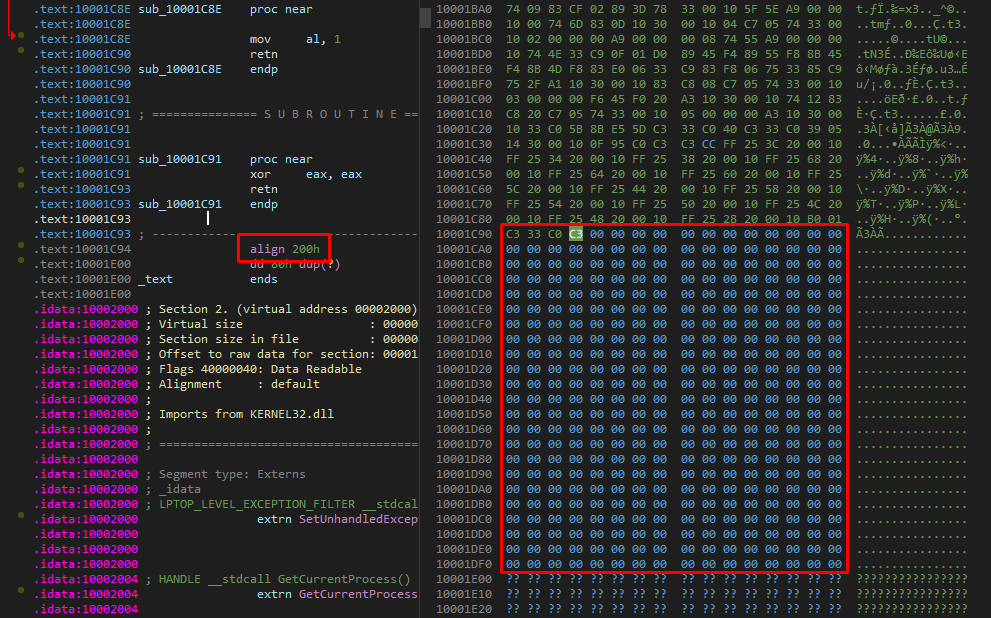
So here at the end of the code, we can see that there are 0x200 null bytes (probably due to virtual alignment), this buffer is allocated so we can use it to write our code.
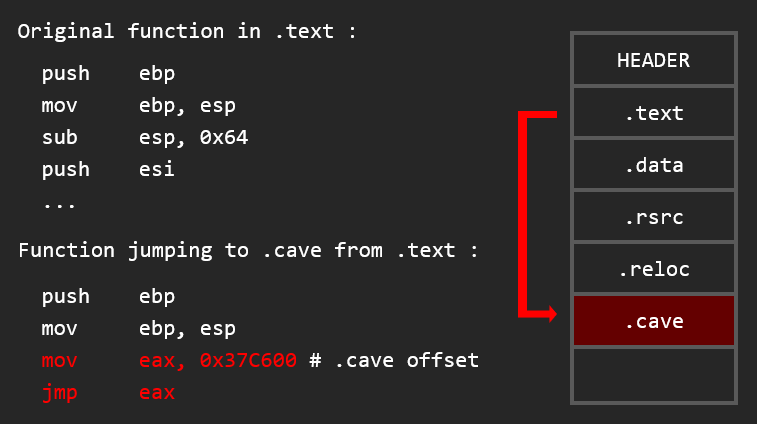
So here we have on the top the function we want to modify, and on the bottom the cave buffer where we will write our code (add BYTE PTR [eax],al corresponding to 0x00, 0x00 opcode)
We write our code in the cave
So after, we write the jump to the cave, of course the followed instructions are not aligned
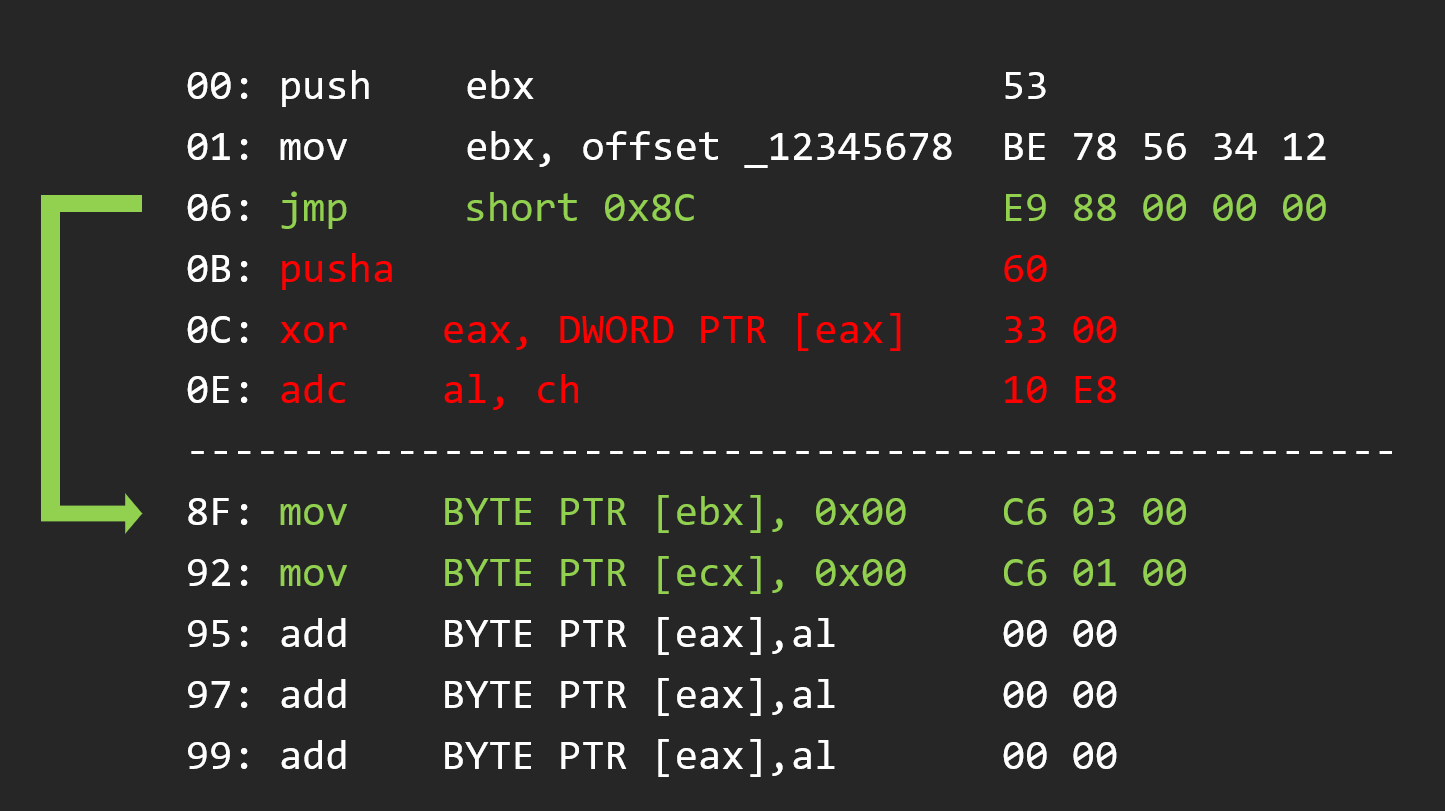
So we have to nop them
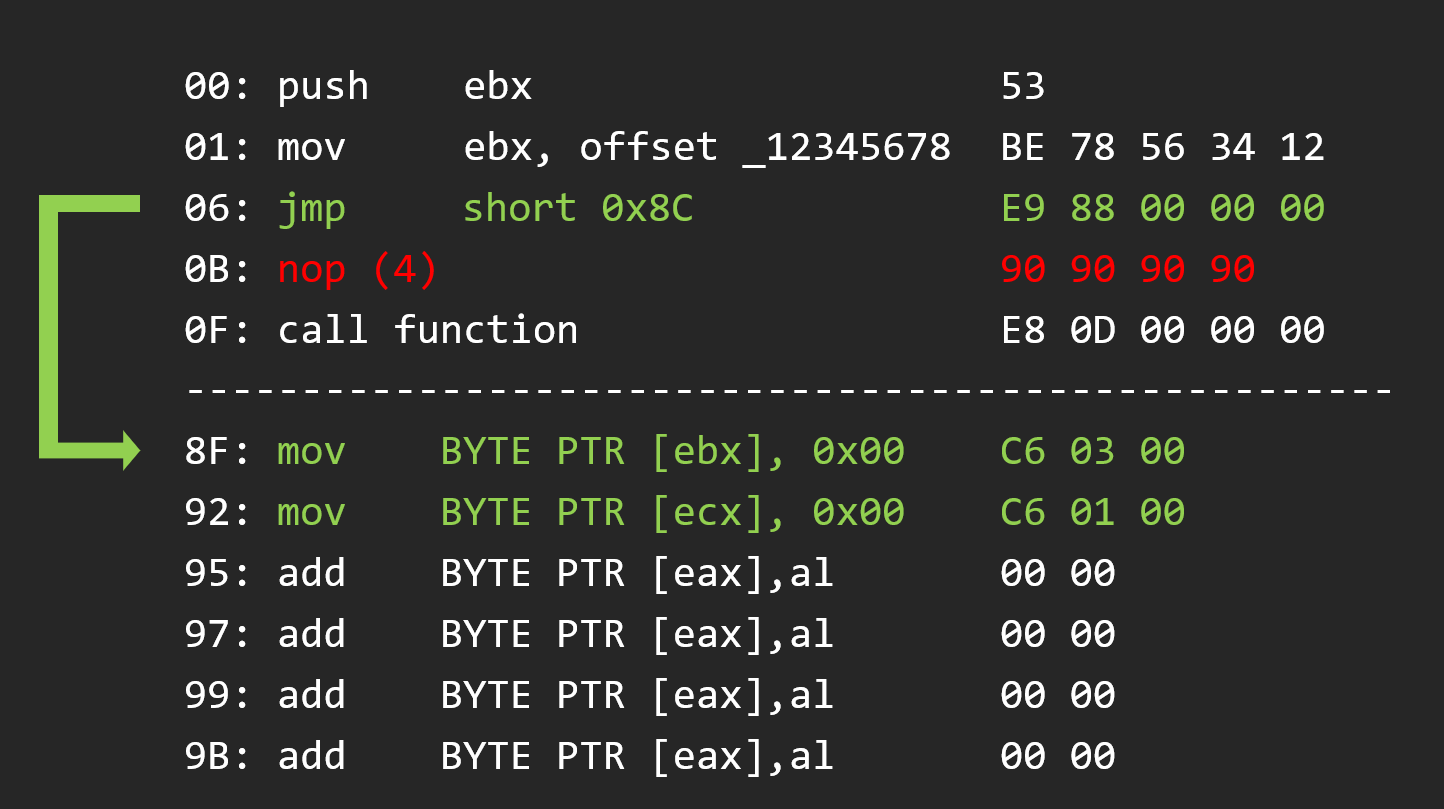
And after we write the opcode that we overrided to keep the code work

And to finish the code caving we have to jump after the original function code
Code caving with new section
So it’s the same thing as code caving, but instaid of writing our code in a existing section, we will add a section to inject our code without size limitation.
My next parts will talk about sections, so I will show how add a section ones.
The new section is always placed after existing sections, because they are fixed with offsets that, if they are changed, will make the executable broken.
Adding a section as some limitations, like for exemple the signature of the executable, the potential data used at EOF (one exemple : Quick analysis about Jar2exe protection 3). And some informations like debug or certificate must be in the last section of the executable, so adding a section could break the entier file structure (reference : Other Contents of the File).
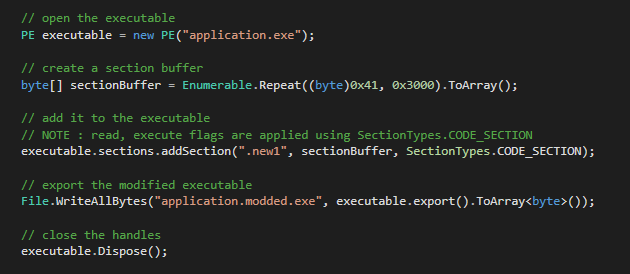
You can add a section with a lot of tools (PEBear, CFF Explorer, PE Tools …) or programatly with a lot of languages (pefile, pe-parse, ….). I show how to do it using my C# library Serana and PEBear in a less automated way.
NOTE : The section should have the memory flag Read and Execute to execute our code.
Here is how you can do it with C# using Serana :
And with a tool like PEBear :
In the Section Headers tab, click on the plus :
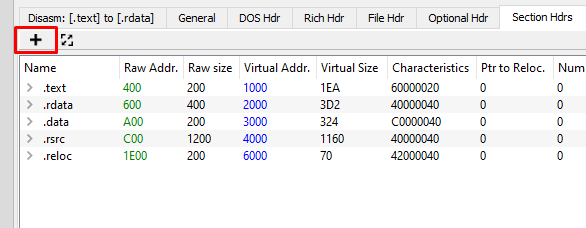
Then setup your section :
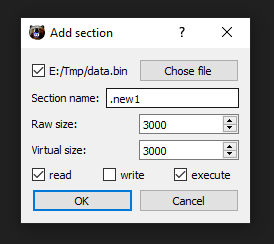
And that’s it :
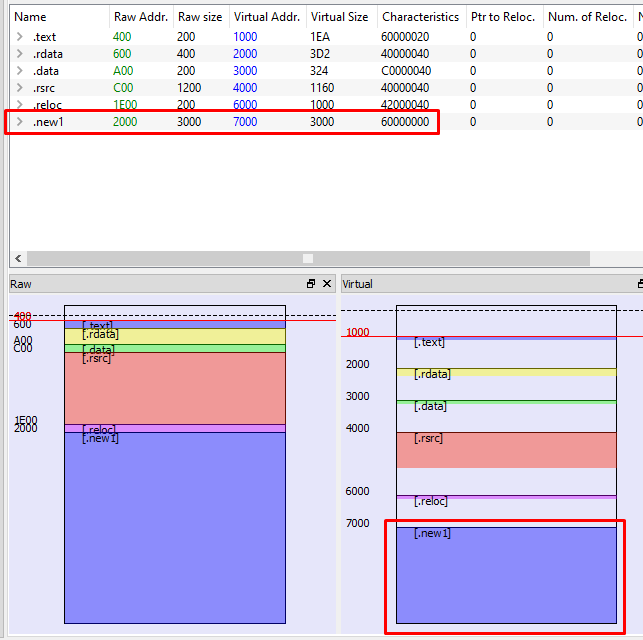
After adding a section, you can just modify instructions somewhere and jump to the section
Creating a new section and make the EP to it
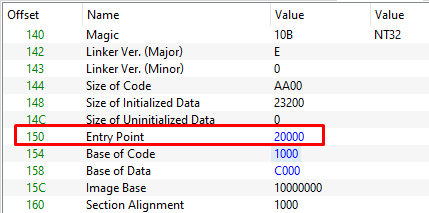
This is the same thing as adding a section with a cave, but instad of changing the code to point to our cave, we change the executable entrypoint to jump directly to our code.
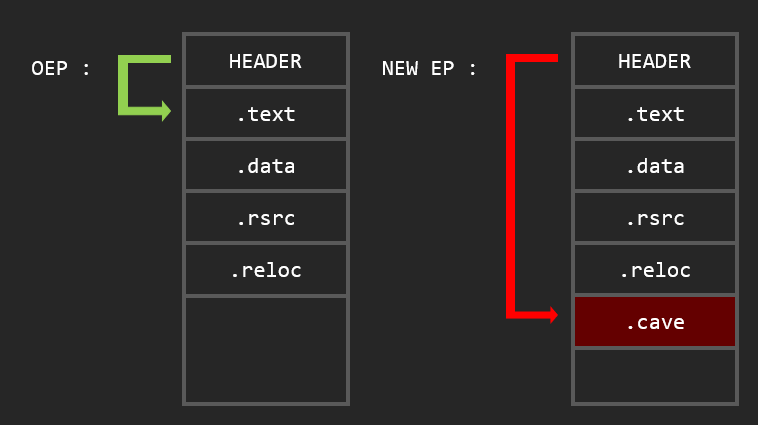
You can do this by simply change the Optional Header Entrypoint. Note that this address is the Virtual address, not the Raw address (see: VA (Virtual Address) & RVA (Relative Virtual Address))
Create a new import to a DLL
For this, you have to add a new entry in the Import table, but in general, the imports are in a section that handle other things. And this means that you can’t extend the Import table without destroying or overriding things in the executable. This trick seems complex at the first look, but in fact, you can fix this issue using a new section. The idea could be to REconstruct the import table by adding a new section that contain the new import table. And change the import table offset in the Optional Header to point to the new import table.
A lot of tool can do this, they are made for other purposes like fixing import table after unpacking, but they do the same thing. You can use PE Bear for this, but I will use the “Import Adder” function of CFF Explorer which is easier to use.
You can add new modules that export functions listed here :
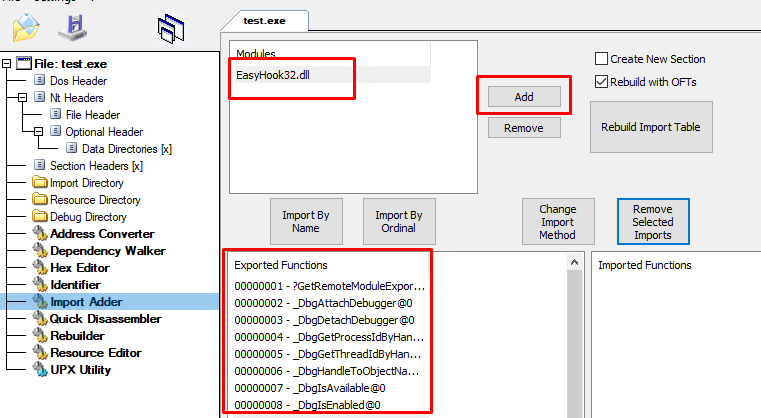
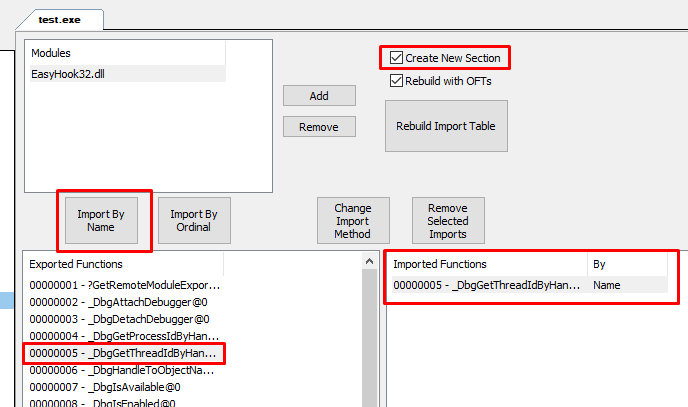
And selection the one you want to add in the new import table. Finaly just have to check “Create New Section” and press Rebuild Import Table.
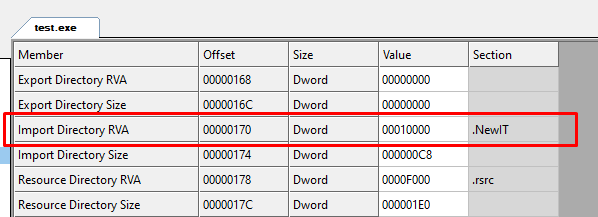
A new section have been added with the new import table in it !
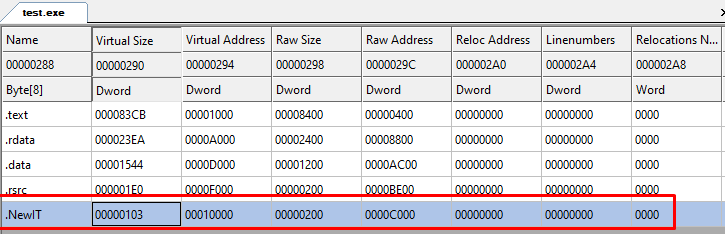
And the import directory in the Optional header has changed to our new section.
Part 2 : From external programme
For this part, I’ve made an entier tutorial about hooking and DLL injection in French on this blog. See : https://whereisr0da.github.io/blog/posts/2019-06-24-function-hooking/
Part 3 : Without interactions with the executable
Coming soon …